How to repair D10 Hydra-Cell® Pro Pumps

There are two types of repairs, process end repairs which are attributed to normal wear or an upset condition and hydraulic end repairs which are atypical and characteristic of older pumps, pumps whose diaphragms were damaged (upset condition) and pumps which have not had their oil changed in accordance with factory recommendations. This article focuses on the more common process end repair procedure and touches upon how to tell if you require a hydraulic end repair.
This article compliments the Wanner maintenance manual and YouTube videos by including some observational analysis to the repair manual instructions that many customers will find useful whether they have one or several hundred Hydra-Cell pumps to maintain. I’m also highlighting some pitfalls to be careful of when buying pumps from places like eBay or non-informed resellers. An ounce of preventions is worth a pound of cure.
We are going to use the Wanner™ Hydra-Cell® Pro model D10 for illustrative purposes, it is likely the most common pump model in the field and its design is very similar to many of their other pump models (D12, D15, D17, D25, H25, D35, D40 and D66). Their smaller pump models (F20, D03/M03) and high-capacity models (T100, T200, Q155 and Q330) are similar enough that this article is still useful; our website provides links to the datasheets, IOM manuals and parts manuals by pump model, so always refer to the IOM manual for your specific pump.
Triage Assessment
So, you come in to work and there’s a Hydra-Cell Pump sitting on your workbench – now what?
-
Observe the pump, do you see oil leakage, maybe a puddle or a certain area of oil concentration? If so note it as it can be handy later in ascertaining the extent of repair required. In particular if the hydraulic end housing of the pump which contains the oil has a crack or if leakage is happening at the pump shaft seal, then the hydraulic end needs servicing, a complex procedure best suited for a trained distributor or the factory to perform.
-
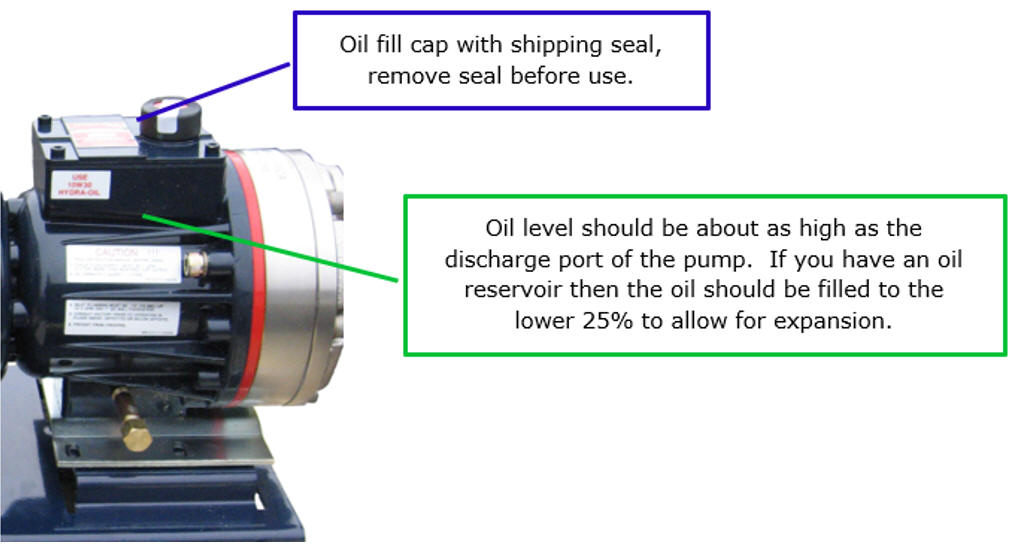
Check the oil level by removing the oil fill cap. The oil level should be at about the same height as the location of the outlet port of the pump. The oil usually looks very black, sometimes greenish; if it is contaminated with your process liquid then you likely have damaged diaphragms (a process end repair that could also involve a hydraulic end repair). If there is very little or no oil in the pump there is an increased chance of hydraulic end damage. If the oil drained from the pump has significant shiny metal shavings in it, that is a sure sign of hydraulic end wear/damage. Some metal in the oil is expected after the initial 100 hr break-in period, thereafter you shouldn’t see much of a silvery sheen in your oil.
-
Rotate the pump shaft by hand, it should easily rotate 360° with slight resistance every 120° (72° for five chamber pumps). If the pump shaft is frozen-stiff or very difficult to rotate, you have hydraulic end damage.
-
Drain any liquid from the process end and oil from the hydraulic end with their respective drain plugs. If process liquid contaminated the hydraulic end and the shaft rotates smoothly, flush the hydraulic end with some fresh oil.
-
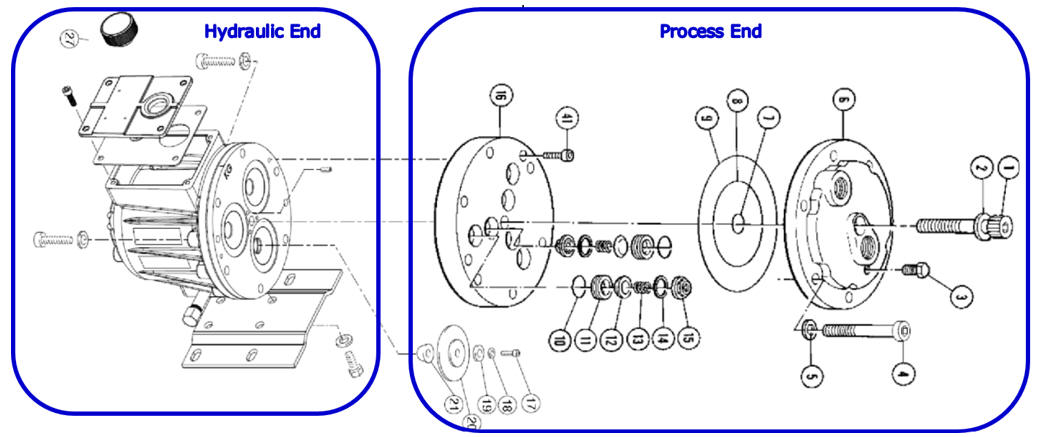
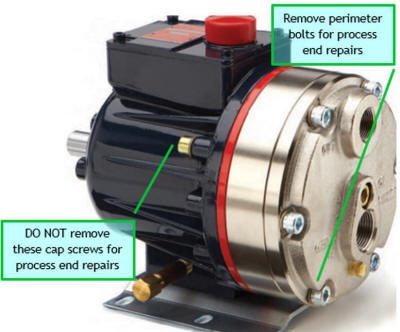
Proceed with removing the perimeter bolts (or cap screws) and center bolt if your pump has one. The hex heads are located on the liquid end side, do not remove cap screws which are from the hydraulic end oriented towards the liquid end because those hold the hydraulic end housing to the cylinder plate (they keep the hydraulic end together).

-
The plate having the inlet and outlet connections is referred to as the “manifold” and it contains o-rings. Observe the o-rings, if they appear frayed around the edges, the pump was over-pressurized and you should follow the IOM manual instructions for checking for manifold warp.
-
Observe the valve plate which is still attached to the pump with cap screws. Do you see any foreign material impeding check valve seating? Are the valve spring retainers (often plastic, sometimes metal) damaged? Are the springs compressed holding the valve against its seat or is it cockeyed? Such observations reflect a poor inlet condition, incompatibility with the liquid (chemical or temperature) and valve/seat/spring/retainer wear.
-
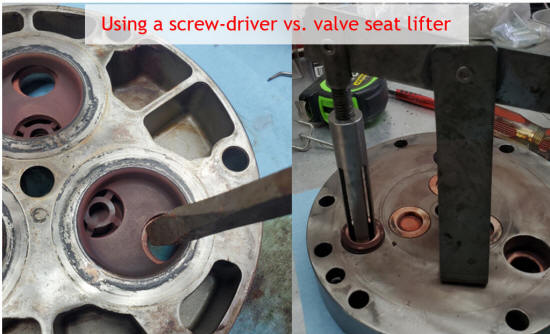
The check valves are easily removed by hand with exception of the valve seats. We offer a handy fulcrum/lever lifter to pull the valve seat from the valve plate. If you do not have one you can use a flat head screw driver to carefully dislodge the valve seats. Care needs to be taken such that you work the perimeter of the valve seat so that it does not become jammed in the valve plate.
It is easier to remove the check valves and seats after removing the valve manifold and laying it flat on your workbench; you can flip it over as necessary to push-out the outlet valve seats.
 The IOM manual explains how to analyze the liquid end components; it really
isn’t necessary to replace the diaphragms unless you notice physical damage to
them because (with the exception to PTFE encapsulated diaphragms) they do not
wear from flexing, only over-pressurization, chemical/temperature attack and
cavitation damaged diaphragms (older pumps only).
If you have an old-style Hydra-Cell pump or a model for which Kel-Cells are not used, you will need to fill the hydraulic end with oil and “burp out” the air from behind the diaphragms before reattaching the valve plate. All the Kel-Cell generation pumps are easier and less messy to prime so you can proceed to reattach the valve plate before filling with oil.
3 Ways to Prime a Kel-Cell Generation Pump
The
easiest method and the one I prefer is to push against the diaphragm follower
with my finger; you have to be careful and this should only be attempted if you
will be rotating the pump shaft with your other hand because your finger can be
pinched. You push against the diaphragm trying to hold it back from flexing
while rotating the shaft and when you cannot hold it back, that diaphragm is
primed, proceed to do them all that way. I like this method because you can feel
how strong the flex is – the IOM manual suggests using the eraser end of a
pencil for safety purposes.
The reason I like this method the best is I receive confirmation that all diaphragms are flexing strongly before I install the new check valve components and reassemble the pump head. I like that physical confirmation before proceeding.
You can also use a vacuum pump, we sell a kit for this purpose, and it will connect to the oil fill port, enabling you to draw a vacuum on the filled hydraulic end. When you let it sit long enough, any air that was trapped behind the diaphragm is pulled out via the vacuum created. You can then rotate the shaft and witness the diaphragm flexing prior to rebuilding the check valves etc.…The 3rd method is to replace the check valves and rebuild the pump head, then fill with oil. Now you need to pressurize the inlet to at least 2 PSI while rotating the pump shaft to force the air out from behind the diaphragms. Using compressed air is probably easiest if the pump is on a workbench, all you need to do is adapt your air source to the pump inlet and plug-off the pump outlet. If your process has an inlet pressure >2 PSIG, then just simply re-install the pump.
Shaft rotation for repairs and operation doesn’t matter!
Installing the check valve components into the valve plate when it’s attached to the pump is a little tricky, it’s easier if you tilt the pump back a little, I use a 2x4 block that angles the valve plate enough such that the components don’t fall out while putting them together.
If your application allows for it, applying a little silicon grease to the o-rings and in the valve manifold pockets helps things slide into place and its tackiness helps hold them in position.
Your oil cap is initially shipped with a black shrink wrap seal across the vent port; you are supposed to remove this prior to operating the pump, but many don’t. This is put here to help prevent oil leakage during shipping, especially for the small pumps that go by UPS/FedEx. If you are shipping your repaired pump someplace, wrap some electrical tape around the top of the oil fil cap and tag with a note to remove prior to operation.

“Deals” on eBay
It’s not just eBay, any reseller that isn’t experienced with Hydra-Cell Pumps will have little idea as to the actual condition of the pump they are selling. I’ve bought pumps from eBay several times and have concluded that it just isn’t worth the risks involved.
Telling if the shaft rotates and taking it apart to inspect the liquid end components is easy enough, so is looking at the oil. What you really cannot evaluate well is any wear in the hydraulic end. In my experience used pumps typically “fail” and are sold-off rather than repaired for expediency reasons. So, you invest in the pump, freight to receive it and then it takes about 90 minutes plus the cost of a fluid end kit (our online pricing calculator will work for most pump part numbers) at a minimum.
Hydraulic end damage “can” be repaired, many of our customers are qualified to make those repairs. If you are experienced with repairing things like engines, then you’ll do fine working on the hydraulic end. Evaluating the extent of worn and damaged hydraulic end components comes with experience and we prefer to leave that to the factory. We can arrange shipment to the factory if you provide your serial number and part number (stamped near the oil cap on the topside of the pump). The factory typically processes hydraulic end repair orders quicker than newly manufactured hydraulic ends, although they still get caught-up in the bench testing queue so I’d allow about 4 weeks for a factory repair (1 week for them to receive it, 2 for the repair, testing and shipping and 1 more week until you receive it).
Other articles that would be helpful to those new to Hydra-Cell pumps are:
We are extremely accessible, often just a phone call away, feel free to call us with any questions and we can help guide you through the repair process (908.362.9981). Fortunately, the sealless nature of Hydra-Cell pumps results in relatively infrequent, inexpensive and easy to do repairs that do not require special tools or expertise. If you are experiencing ongoing issues reach out to us so we can offer our insight to maximize reliability while minimizing downtime and maintenance.
Please send us an inquiry describing your pump application and we will reply promptly, usually the same day; feel free to call us for immediate consultation with an applications engineer.


